Description
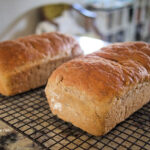
Soft and delicious sandwich bread made with a blend of flours, oats, nuts, and seeds. You’re going to love how simple it is to make this homemade oat and nut bread!
Ingredients
Scale
- 8–9 cups of flour (half wheat/fresh ground flour and half bread flour*)
- 1 cup of old-fashioned oats
- 1/2 cup finely chopped walnuts
- 1/2 cup sunflower seeds (unsalted or lightly salted)
- 1 1/2 tsp sea salt
- 1 1/2 tbsp active dry yeast
- 3 cups warm water (about 110 degrees is perfect**)
- 1/3 cup melted coconut oil
- 1/3 cup honey
Instructions
- Turn the oven on and set a timer for three minutes. After three minutes, turn the oven off. (This will give your dough a warm place to rise).
- Combine the 6 cups of the flour, the oats, walnuts, seeds, and sea salt in a large mixing bowl. Mix together the yeast and warm water in a large measuring cup. Let the yeast mixture stand for a couple minutes, then pour in the oil and honey. (PRO TIP: melt/measure the oil in a measuring cup and then use the same measuring cup for the honey. The honey will slide right out).
- Pour the liquid mixture into the bowl of dry ingredients. Stir the ingredients together with a wooden spoon until a wet dough is formed. Add the remaining 2-3 cups of flour to the dough, adding in about a half-cup to a cup at a time until a soft dough comes together.
- Transfer the dough to a floured countertop and knead for about 5-8 minutes until the dough is smooth and no longer sticky. (Keep dusting the dough with flour as needed).
- Drizzle the empty mixing bowl with a little oil, plop the ball of dough into the bowl, then flip it over so the top is oiled. Loosely cover the bowl with a tea towel and place in the warm oven to rise for 30 minutes.
- Grease two bread pans with butter/oil. After 30 minutes, take the dough out of the oven and punch it down. Divide the dough in half, and set one half to the side. Press out one portion of the dough into an 8×10″ rectangle. Roll the dough into a TIGHT log. Pinch the seam closed, then place the loaf seam-side-down into the greased bread pan. Repeat for second portion of dough.
- Cover both bread pans with the tea towel and place then back into the warm oven. Set a timer for 15 minutes. After 15 minutes, remove the loaves from the oven and gently set them on the stove to keep rising. Turn the oven to 375.
- When the oven reaches 375 degrees, uncover the loaves and gently place them in the oven. Bake for 30 minutes, until the loaves are browned on top (the center should be about 180 degrees).
- Let the bread cool in the loaf pans for 10 minutes, then take a bread knife and run it around the edges of the bread pan. Carefully remove the loaves from the pans and let them continue to cool on a cooling rack.
- You can slice the bread once the loaves are mostly cooled. (The cooler the bread, the easier it will be to slice).
Notes
*The texture and taste of your bread will vary according to the ratio and types of flour you use. My favorite is equal parts whole wheat and bread flour. You can also follow this recipe with all-purpose flour.
**The water should be warm to the touch, but not scalding. Water much over 110 degrees could kill the yeast. I use hot tap water, but you may want to measure the temp of your water the first few times to see how hot your water gets.