
I remember very well the first time I tried to tackle cooking a whole chicken. At the time, most of my cooking involved food that was packaged in cardboard boxes and metal cans, or food that was conveniently frozen in plastic bags. This was how I grew up and I was just doing what I knew. But I was also a new wife, excited to learn to cook and plan meals to fit our budget. I recognized that there was still a lot of room for growth in these areas. It was during this time that a good friend told me how frugal it is to buy whole chickens. Twenty-nine cents a pound?! That kind of deal is hard to turn down when you’re a homemaker trying to pinch as many pennies as possible.
Thus, off to the store I went to purchase a few inexpensive birds. Not being one to always tackle challenges immediately, though, the chicken were put in the freezer when I arrived home.
On the day I felt up to the task, I took a chicken out of the freezer and put it in some cold water to defrost on the counter. A few hours later I gathered what I needed to start– a pair of scissors, a roasting pan, and my husband. Well, in case you don’t know, a whole chicken that is completely frozen needs more than just a few hours in cold water to defrost. This chicken was still almost completely frozen. But I was determined. The time had come for me to learn a new skill and stubborn me was not going to change plans simply because the chicken was still rock hard…
I delegated that task of cleaning out the chicken to my husband, (teamwork and all…) After about twenty minutes of hot water, cold fingers, and a lot of laughter, the chicken was finally ready to be cooked. One step further in my homemaking journey.
Fast forward five years and I cannot tell you how many whole chickens I have cooked. There have still been many times where I have stood over my kitchen sink running hot water into the cavity of the chicken, trying to pry out the frozen organs with stiff, numb fingers. There have been many times when I’ve cooked the chicken upside down because I can’t figure out which side is the top.
Even so, let me encourage you that while trying to cook a whole chicken might be a daunting task if you have never tried before, it doesn’t need to be something you shy away from. It can be a simple, frugal, and healthy way to feed your family.
One of the most helpful habits I have developed in my kitchen is roasting a whole chicken and keeping it in the refrigerator to use for quick meals. Roasted chicken is extremely versatile. The tender meat can be quickly used for pastas, soups, sandwiches, salads, and much, much more. This habit is also great for stretching meat. Eating less meat at meals is an easy way to start saving money in the kitchen. I have found that when I am just taking what I need for a quick lunch, I don’t feel like I need to use a lot.
Roasting a chicken at home is a gift that keeps on giving because once you’ve used all the meat for several delicious meals, you can use the bones to make nourishing chicken broth which can be used for even more meals. Yes please.
Do you think you’re up for a new challenge? Want to learn how to cook a whole chicken?
Or maybe you already know how to cook whole chickens but you just need a few fresh ideas. You’ll find both below.
One Whole Chicken…
One (thawed!) whole chicken + one hour = a week’s worth of convenience.
This method is the simplest and quickest way I have found to roast a whole chicken. Five minutes of prep time is all that is needed and the chicken only needs an hour to cook. Easy peasy. Many thanks to America’s Test Kitchen for teaching me this simple method.
Quick and Easy Roast Chicken
Ingredients List
- 3lb-4lb whole chicken, organs removed
- 2 Tbsp olive oil
- salt and freshly ground pepper
Method
- Prepare what you will need before you start handling the chicken. Cut a piece of kitchen twine about 8 inches long. Pour the olive oil into a small dish. Use another small dish to hold about a teaspoon each of salt and pepper. Having these ready before you start handling the chicken keeps the process simpler and helps you not to have to wash your hands three times while preparing the meat.
- Preheat your oven to 450°. Place an oven safe skillet in the oven while it is preheating. (The pan needs to be hot when you put the chicken in).
- Pat the chicken dry with a couple of paper towels.
- Tie the legs together with kitchen twine. Tuck the wings under the chicken.
- Use your hands to spread the olive oil over the top and bottom of the chicken, as well as over the legs and thighs. Sprinkle the salt and pepper mixture over the entire chicken.
- Carefully remove hot pan from oven. Remember not to touch the handle as it is very hot! Using tongs or your hands, carefully place the chicken in the hot pan with the breast side up.
- Return the pan to the oven and cook at 450° for 30 minutes or until the chicken registers 120° in the breast and 135° in the thighs.
- Turn the oven off and leave the pan in the hot oven for another 30 minutes or until the chicken breast registers 160° and the thighs register 175°.
- Remove chicken from oven and let sit 10 minutes before carving.
You can choose to completely cut up your chicken right after you finish roasting it or take a little off each time you need it. Most often I opt for the latter to save time on the front-end.
…5 Lunches
Here are 5 ways you can use your roast chicken during the week. And yes, these are often our typical lunches. Once my husband started working from home, I had to adjust our lunches a little to make sure they were filling enough for his appetite. Of course, if these lunches would be too hearty for your family’s needs, these ideas would work just fine for dinners too.
Pizza
Quick. Versatile. Delicious. Homemade pizza is a staple at our house.
- Start with dough for a crust. Store bought or make your own.
- Choose a sauce: Pesto. Italian dressing. Ranch. Tomato sauce. Or simply use sliced tomatoes.
- Top with cheese. Mozzarella. Feta. Parmesan. Cheddar. A combination of cheeses.
- Add toppings. The sky is the limit. Be traditional. Be adventurous. Find what your family loves.
- Bake at 450° for approximately 10-12 minutes.

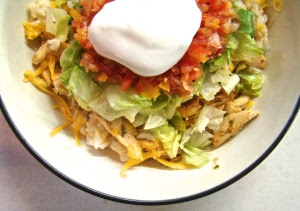
Mexican Rice Bowl
Another quick lunch idea using your roasted chicken i a Mexican rice bowl. This is especially convenient when you have leftover rice in your refrigerator from another meal. Add a cup of roasted chicken to a sauté pan, stir in a couple tablespoons of a taco style seasoning blend and a quarter cup of water, and bring to a simmer. Simmer for 5-10 minutes until the water is reduced and the chicken is hot and flavorful.
Chicken, rice, and what else? Most often this is determined by what is on hand in my refrigerator or freezer. Here are a few suggestions to add to your Mexican rice bowl:
- cheddar cheese
- beans
- salsa
- chopped and/or sautéed onions and peppers
- corn
- shredded lettuce
- guacamole or sliced avocados
- plain Greek yogurt or sour cream
Buffalo Chicken Grilled Cheese Sandwiches
Turn a simple grilled cheese into something a little more filling and delicious. One of our favorite grilled cheese sandwiches is made by mixing equal parts mozzarella and cheddar cheese, ranch dressing and a little Frank’s Redhot sauce, chopped spinach, and (of course) some shredded roasted chicken together. Squish in between two slices of bread, melt, and enjoy!

Garlic Butter Orzo with Chopped Spinach and Roasted Chicken
This dish really says comfort and convenience to me. We don’t do much mac’n’cheese here but when I’m wanting a simple cheesy pasta dish, this is what I make. I like that even though it is cheesy pasta, it also has some protein and something green. And it can be made in fifteen minutes or less.
Directions:
- Bring 4 cups water to a boil in a mid-sized pot. Add 1 tablespoon olive oil and 1 1/2 C orzo. Stir well. Cook over medium high heat for 10 minutes or until the pasta is cooked through, stirring a couple of times to prevent the pasta from sticking to the bottom of the pot. Drain, stir in an additional tablespoon of olive oil, and season with salt and pepper to taste.
- While the pasta is boiling, melt 2 tablespoons butter in a saucepan over medium heat. Add 2 minced garlic cloves and cook until fragrant, about 1 minute. Stir in 1 C shredded roasted chicken. Cook until chicken is heated through, about 5 minutes. Add 1 C chopped spinach and stir until just wilted, about 1 more minute.
- In a serving bowl, combine the cooked orzo and the chicken mixture. Mix together well. Stir in 1 C shredded Parmesan cheese.
- Serve.

Greek Style Salad With Roasted Chicken
Salads can be very simple to throw together with a few staple ingredients. They can also be very flexible based on what you have on hand. Throw on some protein on top and you have a meal.
We have come to love Greek salads. Actually, my husband has always loved them but I am a late bloomer when it comes to appreciating a good Greek salad.
Our easy Greek lunch salad includes chopped romaine lettuce, kalamata olives, feta cheese, red onion, cherry tomatoes and roasted chicken. Mix together a simple Greek vinaigrette and you’re ready to go.
Quick and easy Greek vinaigrette: 1 cup olive oil, 1 cup red wine vinegar, 2 1/2 tsp. garlic powder, 2 1/2 tsp. dried oregano, 2 1/2 tsp. dried basil, 2 tp. pepper, 1 tsp. salt, 2 tsp. onion powder, 2 tsp. Dijon-style mustard, Mix together and shake well.
More Ideas for Simple Meals Using Roasted Chicken
- Add to a soup.
- Make a creamy chicken salad.
- Add to a cold pasta salad.
- Slice and serve with sides.
- 3lb-4lb whole chicken, organs removed
- 2 Tbsp olive oil
- salt and freshly ground pepper
- Prepare what you will need before you start handling the chicken. Cut a piece of kitchen twine about 8 inches long. Pour the olive oil into a small dish. Use another small dish to hold about a teaspoon each of salt and pepper. Having these ready before you start handling the chicken keeps the process simpler and helps you not to have to wash your hands three times while preparing the meat.
- Preheat your oven to 450°. Place an oven safe skillet in the oven while it is preheating. (The pan needs to be hot when you put the chicken in).
- Pat the chicken dry with a couple of paper towels.
- Tie the legs together with kitchen twine. Tuck the wings under the chicken.
- Use your hands to spread the olive oil over the top and bottom of the chicken, as well as over the legs and thighs. Sprinkle the salt and pepper mixture over the entire chicken.
- Carefully remove hot pan from oven. Remember not to touch the handle as it is very hot! Using tongs or your hands, carefully place the chicken in the hot pan with the breast side up.
- Return the pan to the oven and cook at 450° for 30 minutes or until the chicken registers 120° in the breast and 135° in the thighs.
- Turn the oven off and leave the pan in the hot oven for another 30 minutes or until the chicken breast registers 160° and the thighs register 175°.
- Remove chicken from oven and let sit 10 minutes before carving.
Great recipes!!!! I have one I need to cook…..now I have have some fresh ideas for meals!!! Thanks for sharing! Do you make stock out of the leftover bones and juices? I have thrown some it in the crockpot with some carrots, celery, onion, salt, and pepper over night for making chicken stock. Another great way to get more for your $$$.
Yes Jen! I always save the bones for stock. Usually I freeze them until I have about 4 chicken carcasses to use and then I make a big batch.
I didn’t mention in because the post was already getting so long. Maybe a future post